27″ IPS Monitor

Along with all of the parts needed for the computer itself I have been researching monitors.  I came across the “Korean” 27″ IPS monitors somehow.  I don’t actually recall where I first read about them but I did.  The gist is that LG, in Korea, makes the IPS panels that Apple, Dell and a few other big name monitor makers buy from them to use as their monitors.  When samples from a batch are tested as bad the entire batch is marked as ‘non grade A’ and not sold to Apple, Dell, etc.  Those grade “A-” panels are then sold to other companies at a cheaper price.

A few Korean companies have been buying those panels and have been selling low priced 27″ IPS monitors.  They have their flaws.  The build quality of the stands aren’t as great as Dell’s, for example.  The monitors only run at 2560×1440 resolution.  You need a video card that can output that resolution and support dual-link DVI.

The upside is these monitors are cheap for what you get!  You get an almost Apple quality screen, 1440p resolution for around $300.  I ordered one this weekend.  It has already made it’s way to Anchorage and, I am hoping, will be delivered Wednesday.  I am excited about this.
Assembly Update

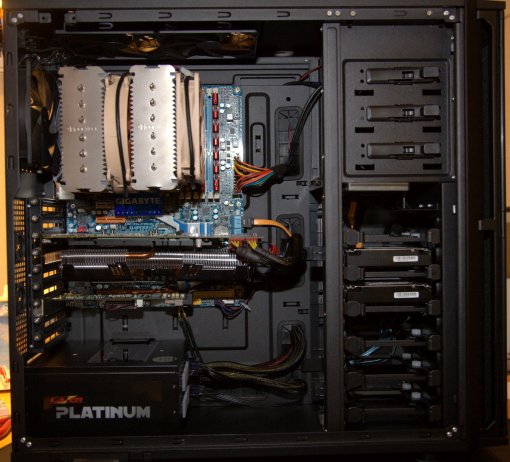
I’m only missing a few parts now but nothing that would stop me from working on assembling what I have.  A current shot of the installation:

Antec P280

Antec P280 with almost all components installed

The current installed hardware inventory is:

  • Case: Antec P280
  • Power Supply: Kingwin LZP-1000
  • Motherboard: Gigabyte GA-EX58-UD5
  • CPU: Intel i7-960
  • CPU Cooler: Noctua NH-D14
  • RAM: 3x Mushkin 4GB
  • Video Card: Zotac Geforce GTX480 Amp!
  • SSD: Crucial M4 512GB
  • HD: 2x Seagate Barracude 1.5TB
  • RAID Card: HighPoint Rocketraid 4310

Power Supply & SSD

Purchased today is the power supply and SSD.

The power supply is the Kingwin LZP-1000.  I had never heard of Kingwin before my research started and I probably would have just thought of them as some cheap import brand.  A few different review sites have said great things about some of their units.  This one in particular gets high marks.  Under 500W when the internal temperature of the power supply is below 65 deg Celsius there is no spinning fan.  Once temps exceed that the fan comes on but once the unit cools down to around 45 deg Celsius the fan once again shuts down.  Even when the fan is running the decibels at one meter have been recorded at 17.  With greater load this does change though.  I don’t need 1000 watts of power but I was attracted to the sexiness of quiet.  I like quiet.

Also purchased today is a 512GB Crucial M4 SSD.  This drive will be my operating system drive.  My current hackintosh has a 300GB Western Digital 10,000RPM Velociraptor.  I have had a great experience with that drive but felt that 320GB was a bit limiting.  512GB should give me a bit more overhead and the statistics on the SSD verses the 10K drive are amazing.  As noted before I intend to use four 1.5TB drives in a RAID configuration (yielding 4.5TB of space) as storage for files, photos, etc.  If the performance of the SSD exceeds my expectations I may add another to host the scenery X-Plane (flight simulator.)

I ordered from Amazon and will receive the power supply on Friday and the SSD is expected to be delivered on Monday.  I hope to be assembling more of this machine this weekend.

Progress is underway

I’ve purchased more hardware over the past month.  New things acquired are:

  • i7 960 3.2GHz CPU
  • Noctua NH-D14 CPU cooler
  • Raid card
  • 1.5 TB hard drives (two of the four I will use in a RAID configuration)

I have enough of the important things to start construction so last evening I un-boxed the case and fitted the CPU to the motherboard.

SSD

I am using a WD Velociraptor 10,000RPM hard drive in my existing hackintosh.  Until recently I haven’t thought of not using one in my new build.  My current drive is 300GB.  A bit too small for my boot drive.  I figured out a few of the big space hog directories and moved them to my RAID drive, with a symbolic link back to their original location.  I’ve been looking at the 600GB Velociraptor and wasn’t happy with the overall reviews.  It seems the 300GB version is bullet proof while the 600GB version is plagued with early death.

I’ve turned my searching to an SSD.  I really want something larger than 300GB and was excited about the prospects of the 600GB Velociraptor.  I found a few 512GB SSD drives that seem to fit the bill performance and price wise.  It seems there are two major types of SSD drives out there.  Sandforce or Marvell controllers.  I believe the Sandforce controller uses compression as it writes data.  The more compressible your data the better the throughput.  I’m not sold on how compressible my data is.

I found the Crucial M4 SSD.  In 512GB size.  Marvell controller.  About $400.  Not bad all around.  It’s not 600GB but then again it isn’t 300GB.  It’s $400 though which is about double the price of the 600GB Velociraptor.  If the budget works out for this build I’m going to take the SSD leap.

RSS Reader – Feedly

With Apple killing off the built-in RSS reader in Safari I’ve started looking at alternative RSS tools.  I found Feedly  and have been happy with it thus far.  What it is lacking is a notifier of some type to let me know that new articles have shown up since the last time I’ve visited it.  If I keep using it I’ll post a follow up in a few months.  If I don’t keep using it I’ll post what I am using at that time.

P280

After comparing the Antec P280 against other cases and with the positive experience of my current Antec P183 I purchased the P280.

It’s big!  Not a lot bigger than the P183 but just enough to make it feel BIG.  I look forward to assembling the components in this case.  There is good room behind the area where the motherboard will go and the side panel so concealing cables should be easy.  Pictures will be posted during the build.

Still a lot of other things to buy so the assembly is still in the future.

Cases

Without much surprise I am on the fence regarding which case to use for Hackintosh2.  I am leaning towards the Antec P280.

The original hackintosh is happily running in an Antec P183.  It runs cool and until the video card fan jumps to full speed runs quietly.  I did have some trouble getting all of the cables run between the frame and the side panel (behind the motherboad) and the hard drive area is a bit cramped.

With those cons to the P183 I have looked at a number of different brands of cases and come back, over and over, to the Antec line.  The P183, that I have, has been replaced by the P183 V3 model.  But then the P280 caught my eye. It’s slightly larger than the P183 and seems to get good reviews.  Cooling seems fine, internal mounting area seems improved and the space between the frame and the side panel (behind the motherboard) has been increased.  That should make running cables between them easier.

The P280 has made my short list.  Now to see what pricing deal I can find.

Hackintosh 2 – The New Beginning

Hackintosh 2 is underway!

As with the first hackintosh a lot of thinking has been going on.  What hardware do I want to focus on, what do I want to do differently this time, what didn’t work so well and what has worked wonderfully.  Thoughts like that.  As with the first time hardware selection is key to a problem free OS X experience.

I knew I wanted a top notch video card.  I purchased a Zotac GTX 480 AMP! I believe I should be able to use the GTX480 under OS X with little difficulty.  The AMP! version is slightly overclocked and comes with an improved cooler integrated into it.

I’ve been looking at the LGA1366 based motherboards on the market.  I want to stick with an LGA1366 based i7 processor.  After a lot of research I decided to find the same motherboard that my first build is based on.  I found a new Gigabyte GA-EX58-UD5 motherboard on ebay.

Here I am now with a motherboard and video card.  I have a long list of components still to research and buy before I can realistically start thinking about the actual build.  What is next?  A case or power supply.  That is information for another post.

Stocking the Ship

**N.B. This post was started late in 2010.  An entire year was skipped, 2011.  Honestly it was skipped because this Hackintosh is working extremely well.  I needed to publish it so that I can move onto the next phase.  Another phase you ask?  Yes, Hackintosh2!  Stay tuned.

Where was I?  It’s been so long I had to go back and read my last few entries.

So she floats.  The hardware build was very successful.  So well that I have not had to redo any of the installation but I have added a few more components.

First I did have to add an external SATA (eSATA) bracket.  I overlooked that addition during the original build.  The case I chose has a front mounted eSATA port but since the motherboard came with a two port, and power, eSATA bracket I decided to install it as well.  I only have one device that that supports eSATA.  I haven’t tried it out yet.  I’m missing the actual eSATA cable.  Eventually I’ll get around to ordering one from monoprice.com.

I have also added three Samsung Spinpoint F3 1TB hard drives.  These drives have 32MB cache and run at 7,200 RPM.  Not as fast as the Velociraptor 10K RPM boot drive but still fast, taken individually.  What I’ve done is add them in as a striped RAID.  The resulting volume is 3TB in size and I get the performance gain of writing to three drives simultaneously!  I have speed statistics that I’ll post at a later time.

The machine has been running flawlessly.  It is now up to OS X version 10.6.8.  Starting at 10.6.4.  I intend to install a new boot drive and load Lion as a clean installation.  Maybe next month.  Maybe.

But now its back to day dreaming about an upcoming vacation.  Ahh, I can smell the salty sea already.